Showing posts with label DIY. Show all posts

Thursday, March 28, 2013

DIY {Scavenger Hunt}

At the beginning of Lent I decided not to give up anything. I never seem to get anything out of doing that, and I definitely don't find that my relationship with God grows any stronger (for me personally) by giving something up, and that's the whole point, right? So this year I decided to do something different. I made a whole list of things I wanted to do instead. In the past I have also tried things like "I'm going to pray more" or "I'm going to pay better attention in church." Obviously, those are good goals, but they weren't specific enough to be effective for me.

That is why this year I came up with a list of specific goals/things I wanted to accomplish this Lent. They were all things aimed at improving my relationships with friends/family, doing a random act of kindness, or deepening my relationship with God. So happy to say that this worked well for me, and I think I'll do it again next year!

One of my little Lenten "goals" was to plan a fun afternoon for the kids I babysit. So often my time with them is the same routine. I pick them up from school at 3:30. We get home, put backpacks away, and get a snack. They relax and watch some TV while I work on a little homework until 4:30. Then I help them with some of their homework, and when that's finished we go back to TV/iPad/homework.

So I thought it might be fun to do something different and something they would hopefully enjoy. I came up with a pretty brilliant idea if I do say so myself.......I planned a scavenger hunt for them!

love scavenger hunts. I've been to 2 birthday party scavenger hunts and 1 bachelorette party scavenger hunt where you had to go around town and take pictures and videos of different things. I just think that is SO fun.

Let me stop right now and say that if you babysit, have kids, or even interact with kids at all, you NEED to do this for them. They really enjoyed it, but I got so much enjoyment out of watching them have so much fun. I already want to do it for all the kids I know :)

Here's exactly how I did it to give you some ideas. Obviously, you can customize it 100% to wherever you're doing it and to the kids specifically. But seriously, this is such a fun idea that I'm pretty proud of myself for........

First off, you need some kind of reward or treat that the kids are working to find. It needs to be a surprise, and also something a little out of the ordinary. I got them cupcakes from one of the local bakeries in town that I knew they liked, but I had never gotten them cupcakes from there before.

Then you need to assemble and hide all of the clues. I took pictures of all of mine so you kind of have an idea of what I did.

When they got home from school, this first clue was waiting for them on the kitchen counter.


Each clue led them to the next clue, which eventually led to a treasure map that led to the surprise.

Clue #1 led them to their crayfish's tank.


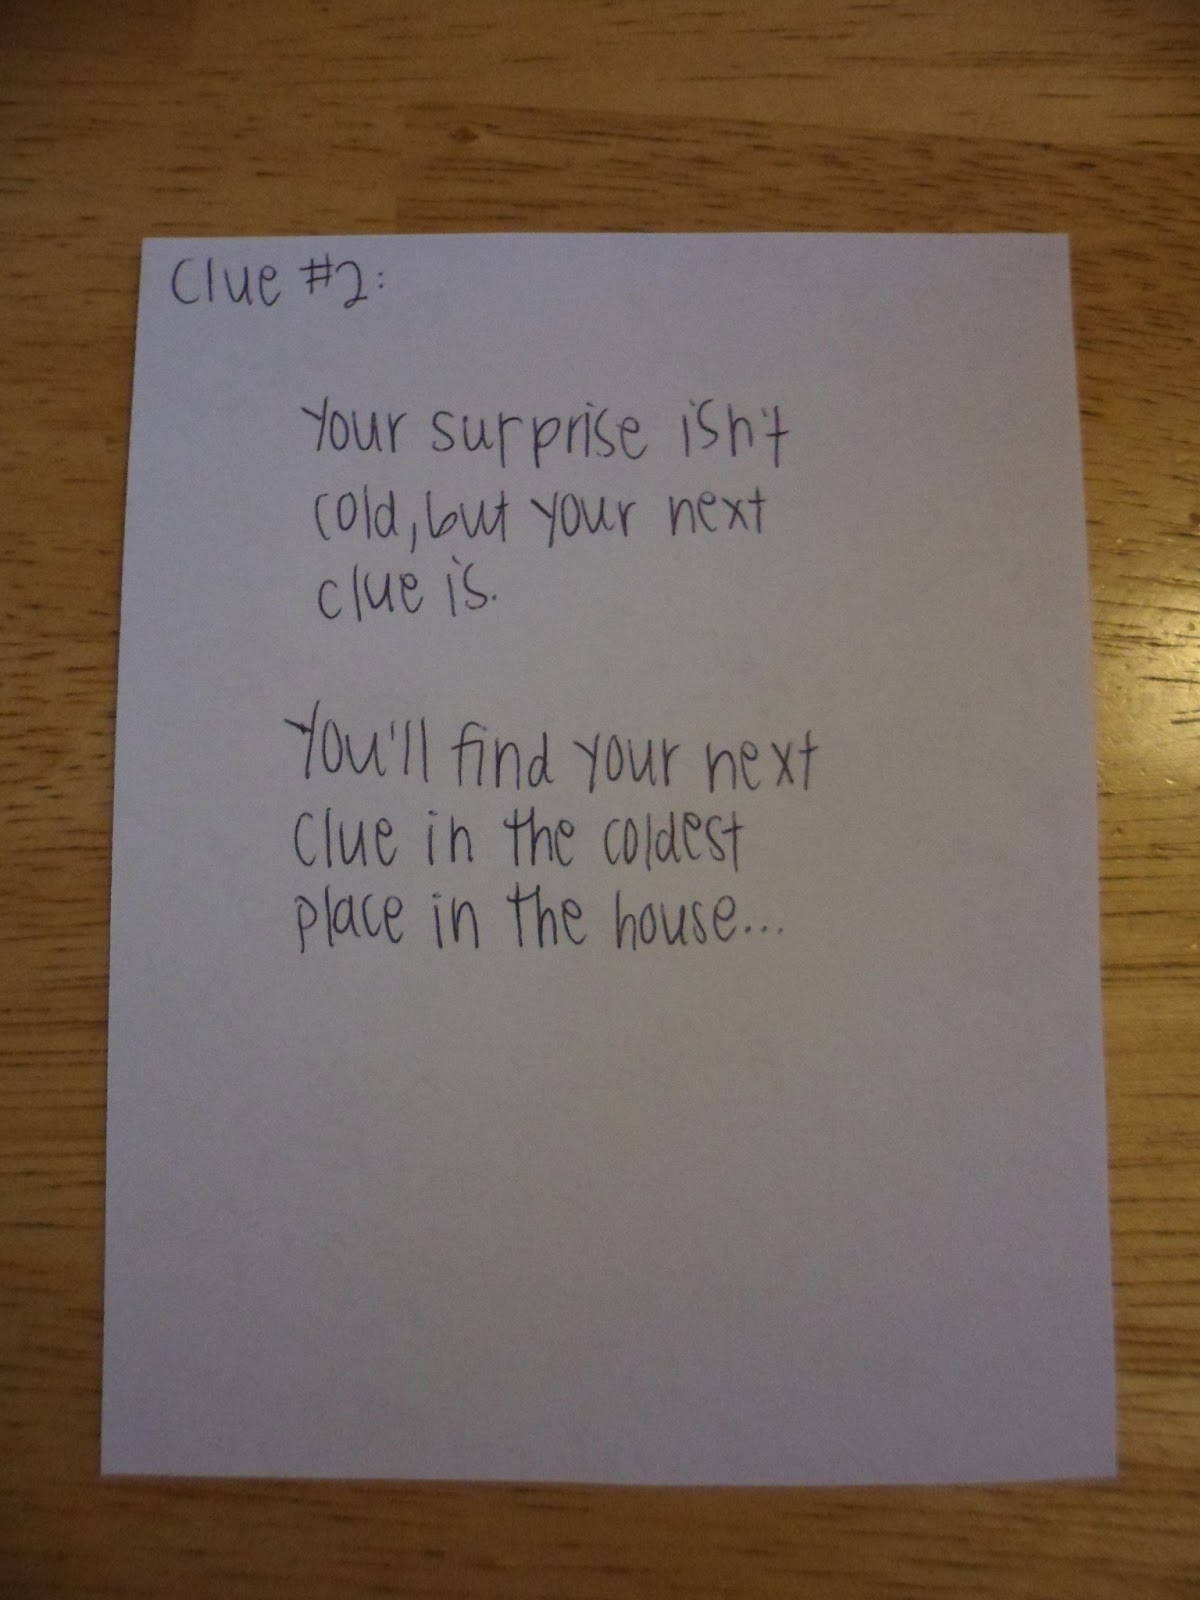
Clue #2 led them to the freezer. Can you spot the clue? I tried not to hide them too hard since the kids are pretty young. I think it was a good middle ground - not too difficult for them to find, but not super obvious either.


Clue #3 led them upstairs to one of their closets.


Clue #4 led them back downstairs where I had a few Easter coloring pages that they had to complete before I would give them the next clue. I wasn't sure how this would go over, but the kids actually really liked it. I also thought it was good to add in something that they had to do.


Clue #5 led them to the garage and their bikes!

I thought my hiding place for this one was pretty good!


The next clue led them to the pantry, where I hid the clue in a lifesavers box - ha!


I hid the treasure map on the front porch.....

"X" marks the spot....

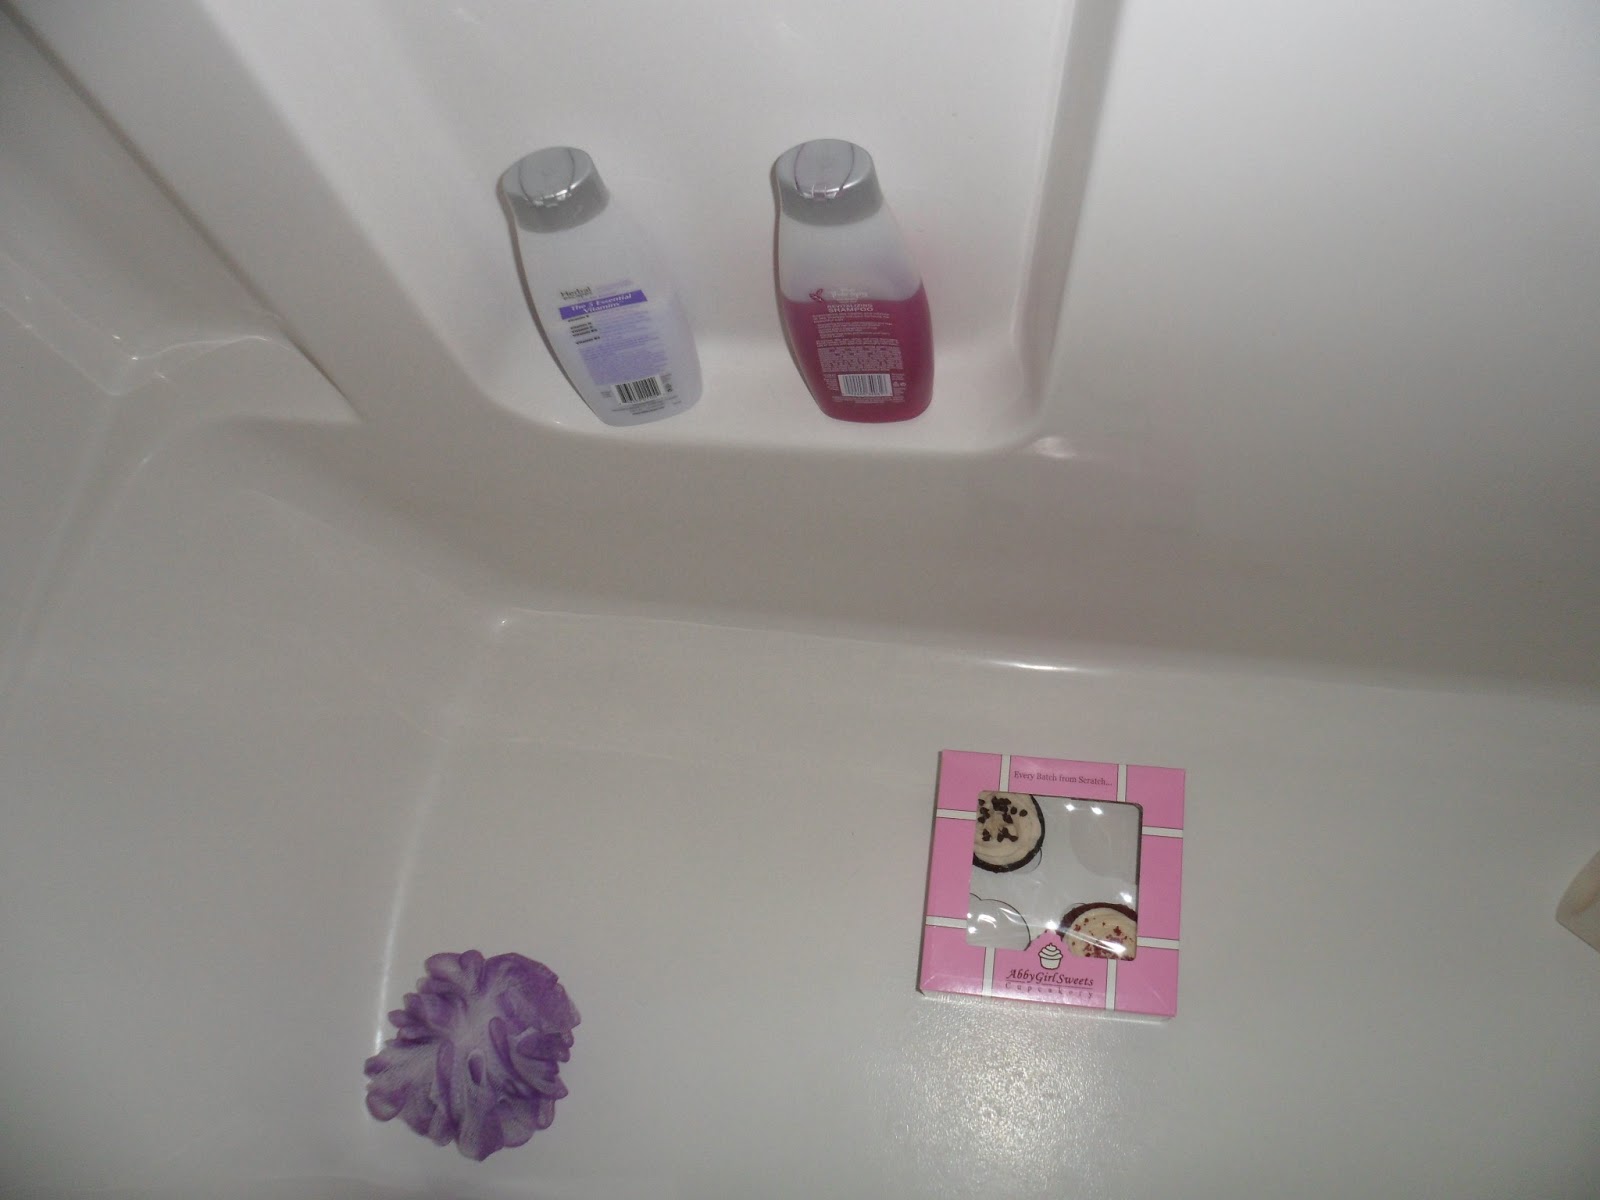
I hid the final treat in their bathtub - ha!

Overall, the kids and I both seemed to really enjoy it (although for different reasons). I loved seeing how excited they got with each new clue.

It's definitely something I would do again, and heck - something I would love to do in another 15 years with my own kids :)

The scavenger hunt was so easy to do, and I can't think of any kids that wouldn't love to do something like this. So take my advice, and plan a cute little scavenger hunt for your cousin, kid, friend, sibling, whoever! I'm pretty sure they will love you for it!

Thursday, January 24, 2013

DIY: Baby Shower Banner

Last week I was asked by one of my mom's coworkers to make a baby shower banner for her daughter's friend's baby shower. Kind of an odd request, but I agreed because I love to do stuff like that! I also heard that they had the baby shower and the lady liked it so much that she took the banner home and hung it up in the baby's nursery. Success!

And I was super proud of myself because I designed the banner 100% myself, and I loved the way it turned out. I think I deserve some kind of Pinterest award for it - ha!

But it was SO easy to do that I thought I'd pass along the instructions of how I did it in case any of you ever need to make a super cute banner for a party. So keep reading if you want to know exactly how I did it.....

1. Design banner on Microsoft Word
I find that Word is generally an easy software to use, so that's what I designed it on - nothing fancy or complicated like Photoshop.

If you go up to Shapes under the Insert Toolbar, you can enter pretty much any shape you want. The theme of the baby shower was owls, so on the first page I inserted a large oval, and on the second page I inserted a large triangle. Then I copied the triangle and pasted it on the subsequent pages until I had enough triangles for the numbers of letters I was making.

(You can click on the pictures to make them larger and easier to see.)

Then you can go (still under the Insert Toolbar) to the Text Box icon, and add a large text box over the triangle on the second page.

I then typed in my first letter (B), and formatted it. I made the letter size 250 and used the font Pea Ellie Bellie (which you can download for FREE here).

Since the colors were teal and gray, I formatted the letter to be teal. I then moved the text box to the place I wanted it to be, and then copied the entire text box.

You can then paste the text box on each subsequent page. Just paste, move (if necessary), and type the next letter needed. I also alternated between teal and gray letters, so you can recolor the letters if you want too.

I was spelling out Baby Heim, and the Pea Ellie Bellie font I used even came with some cute extra characters, so I used a heart (shift +) to separate the words.

After all of your letters are formatted properly, you can go ahead and print them out!

2. Cutting
Next, just cut out all your oval and all of the triangles.

3. Backing
I backed the triangles on construction paper to make the paper thicker, and also to add some color. The teal letters I backed on gray paper, and the gray letters on teal paper. I set one of the triangles on the construction paper, used a ruler to make an outline of a triangle slightly larger than the triangle with the letter on it, and then cut that out and used it as a "guide". I traced that construction paper triangle on my other pieces of construction paper and cut them all out. Then I knew they would all be equal!

Using a glue stick, I glued the letter triangles onto the construction paper triangles and set them aside to dry.

4. Owls
I decided to make 2 owls - 1 for each side of the banner. I totally just designed this myself. I cut out the oval I had printed out and traced that on 2 pieces of gray construction paper and cut those out.

Then I drew a line on my printed out oval so that it formed the shape of a small football that was less then half the size of the oval (if that makes sense?). I cut that shape out and traced it 4 times on a teal piece of construction paper, then cut those 4 pieces out. These pieces will form the sides of the owl.

Then the rest is mainly just decorations! I traced 2 poker chips to form the yellow ring around the owl's eyes. Then I traced a quarter to form the eyes, and a dime for the pupils. I free-handed the triangle beak, triangle ears, and feet. Then I glued all the pieces together, and added a few sequins on the teal part of the owl just to give it something more.

5. Assembling
After all the individual pieces are done, all you have to do is assemble them! I used a hole punch to punch 2 holes in each of the owls and triangles, and then threaded a long piece of string through them to form the banner. Literally SO easy!

Then you're done - and you have a completed banner masterpiece :)


Ignore the fact that this picture looks kind of weird - I had to do a panoramic to get the whole thing in.


You could easily customize this for any occasion or theme! I just think it turned out so cute, and it was actually pretty easy to do.

I can totally see myself making more of these in the future for other parties :)